We have started to play with Microsoft's Team Foundation Services quite a while ago. Last year we did our first talks about TFServices + Windows Azure and started to write articles about it. If you are new to this topic, take a look at the blog article Rainer wrote in November last year. At upcoming TechEd Europe, Rainer will have a presentation on continuous integration with TFServices and Windows Azure Websites (WAWS). In the presentation Rainer will not only demo the basics. He also wants to show how to customize the build workflow and extend it with a custom build task while still using TFServices ability to build a project in the cloud. For this blog post I want to summarize all steps that you have to go through in such a scenario.
My goal for this sample was to build a task that creates a version number based on the current date+time and writes a C# file with the assembly information in it. We also do this in our own product time cockpit for all of our assemblies (using a counted build number instead of a version number based on date+time). The sample application then includes the generated file (called “Version.cs”) instead of a default file containing version number “0.0.0.0” for desktop builds. Please note that in this article I assume that you have some knowledge concerning build workflows in TFS. If this is new to you, I recommend reading the corresponding chapter in MSDN.
Create a new build definition and copy build template
I first opened up the Team Explorer -> Builds and clicked on New Build Definition. Next navigate to the Process tab and hit Show Details. Click “New” and chose to copy to a new build template. By default, this will create a new build process template xaml file in the BuildProcessTemplates folder.
Opening up the newly created file reveals the build process, which is very similar to the on premise variant. You could directly edit the workflow here, but for adding custom activities, especially custom code activities, you need to specify additional references. Therefore I created a new solution with two C# projects, one for the workflow itself and one for the custom code activities.
Create a solution with a C# project for development
I added the build template that was generated for me as a reference in order to not create another copy of it. If the file is opened from that project, the workflow editor will look for the references in the C# project. I therefore added a few references to the Microsoft.TeamFoundation assemblies to make the workflow editor happy. The project for the workflow should look similar to the following screenshot:
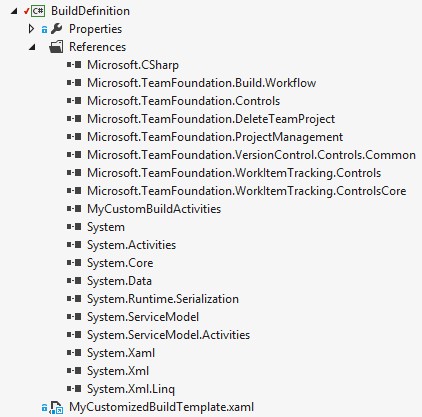
Ignore the MyCustomBuildActivities for now, as this is the reference to the second project containing the custom code activity.
Create a second project in the same solution for custom activities
The second project contains a single class for the custom code activity. All of this is identical to on premise WF, but I tripped over the missing BuildActivity attribute, which will produce a TF215097: An error occurred while initializing a build for build definition error message, stating that it is unable to find your custom activity. The BuildActivity attribute can be found in the Microsoft.TeamFoundation.Build.Client assembly.
The code activity I wrote for generating the version file reads a template and then uses “string.Format” to fill in the Version and Configuration properties:
namespace MyCustomBuildActivities
{
    using System;
    using System.Activities;
    using System.Collections.Generic;
    using System.IO;
    using System.Linq;
    using System.Text;
    using Microsoft.TeamFoundation.Build.Client;

    [BuildActivity(HostEnvironmentOption.All)]
    public class GenerateVersionFile : CodeActivity
    {
        public InArgument<DateTime> InputDate { get; set; }

        public InArgument<string> Configuration { get; set; }

        public InArgument<string> FilePath { get; set; }

        public InArgument<string> TemplatePath { get; set; }

        protected override void Execute(CodeActivityContext context)
        {
            var timestamp = this.InputDate.Get(context);
            var configuration = this.Configuration.Get(context);

            var version = new Version(timestamp.Year, timestamp.Month * 100 + timestamp.Day, timestamp.Hour * 100 + timestamp.Minute, timestamp.Second);

            var filePath = this.FilePath.Get(context);
            var versionFileTemplate = this.TemplatePath.Get(context);

            File.WriteAllText(filePath, string.Format(File.ReadAllText(versionFileTemplate), version.ToString(4), configuration));
        }
    }
}
Set the version control path to custom assemblies
Since you cannot just copy the assemblies to the build machine (it runs in the cloud and is not under your control) you have to check-in a compiled version of the build activity assembly. I created a new folder and added the debug assembly. To be on the safe side, check that your code is compiled to AnyCPU.
You then have to configure the build controller to pick up the assemblies located in that directory. To do this, click Actions on the Build page of the Team Explorer and select Manage Build Controllers:
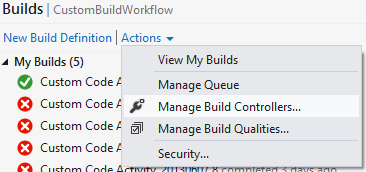
You can tell from the screenshot above that it took me a few iterations to get this working ;). Select the Hosted Build Controller, and click Properties…. In that dialog, set the path of the Version control path to custom assemblies to the path that you checked in the custom assembly at.
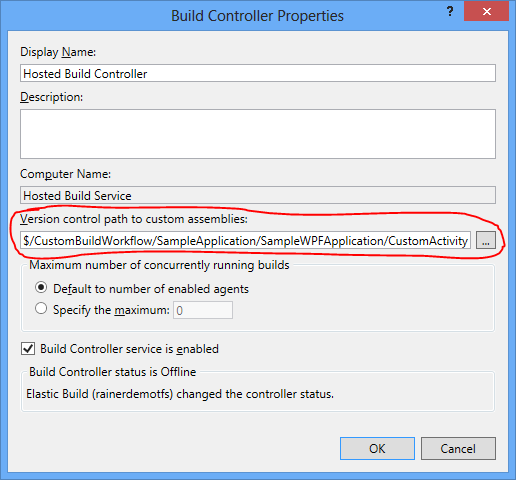
Note that you can only select a single directory per controller. For TFService, this means that you can only have a single directory for the assemblies. When I customized the build process for time cockpit, I wished that I could branch that folder and set that per build definition, but once you have the build running, you do not want to change those activities on a day per day basis anyhow.
Place the custom code activity in the workflow
To place the activity in the workflow, open up the Visual Studio Toolbox (Ctrl+Alt+X per default) and add a new Tab. In this new tab, select choose items from the context menu and point it to the checked-in assembly. You should see your code activity appear in the toolbox. You can then grab that item and drop it into the sequence of the workflow.
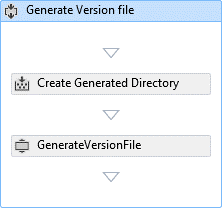
In my case I created a new sequence after the Initialize Workspace sequence in section Process > Sequence > Run On Agent. In the sequence I first placed a CreateDirectory activity that creates a directory named Generated in the source directory (variable SourcesDirectory). After that I placed my custom code activity, GenerateVersionFile that reads a template from a file which I also checked in.
The sequence looks similar to this:
Queue a build to check that the custom code activity is executed
In order to verify that your custom code activity is executed, trigger a new build. Once it is done, open the log and search for the name of your activity: You should find something similar to this:
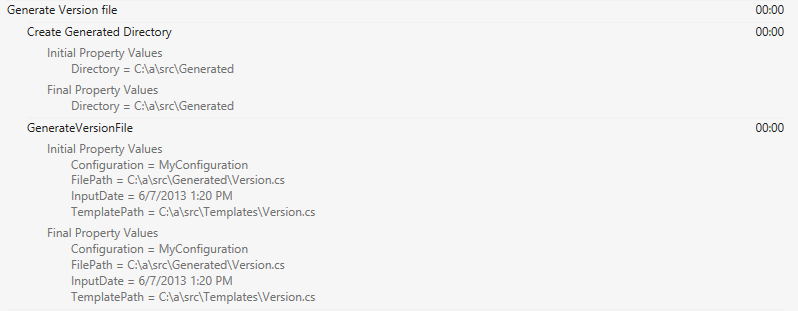
Note that I turned the log verbosity to “Diagnostic” in order diagnose the issue of the missing BuildActivity attribute.
Pitfalls
While the variables available in the build are similar to the ones found in the on premise template, their values are quite different (and a lot shorter ;). This means that the binaries directory is not called Binaries (that’s what it is in TFS 2010 at least) but bin. Therefore, be sure to always concatenate the values of the variable names and not assume any directory names. The relative structure, as far as I have seen though, is identical.
As mentioned above, be sure to supply the BuildActivity attribute (http://msdn.microsoft.com/en-us/library/microsoft.teamfoundation.build.client.buildactivityattribute.aspx), otherwise you will get the TF215097: An error occurred while initializing a build for build definition build error. If TFService Build would be charged per triggered build, that one would have cost me a fortune.
While I have not run into this limitation, be sure that your build time stays below an hour, since that seems to be the maximum time out. For more information on the hosted TFBuild Service, be sure to check this page as well: http://tfs.visualstudio.com/en-us/learn/hosted-build-controller-in-vs.aspx I got a lot of info from there. It also features a checklist weather your build requirements can be met by the Hosted Build Controller Infrastructure. If not, you can always add an on premise build machine or run your build server in a Windows Azure VM.
comments powered by