Recently I did a WiX (Windows Installer XML) and MSI training at a customer in Germany. One of the questions I got asked was how to deliver large MSI installers efficiently to customers via web. The goal was to minimize download time. In this blog article I describe a possible approach.
You can download the entire sample from my GitHub Samples repository.
WiX/MSI Preconditions
In many cases developers try to keep things simple by packaging everyhing an installer needs into a single MSI file. WiX has a very convenient feature for that: MediaTemplate with EmbedCab="yes".
The problem with this approach is that the MSI quickly gets quite large. This isn't an issue for small applications and customers with strong internet connections. However, if you have to deliver complex installations to devices spread over the whole globe partly with GPRS connections, this becomes a big problem.
Fortunately WiX and MSI are old technologies. They where originally developed in an age where software was shipped using diskettes. For those of you how are too young, here is the Wikipedia article describing what a "diskette" is ;-) At that time, installers were too large for a single storage medium. Data had to be split up. For that, MSI supports external Cabinet files (CAB).
In WiX, you can setup media using the Media tag. Once you defined your disks, you can assign each File to the appropriate disk. The following example shows how this is done. It is taken from a larger sample that you can find in my GitHub Samples repository.
<?xml version="1.0" encoding="UTF-8"?>
<Wix ...>
	<Product ...>
		<Package ... />

		<!-- Note that this variant of the sample splits installer into multiple CAB files -->
		<Media Id="1" Cabinet="Disk1.cab" EmbedCab="no" CompressionLevel="high" />
		<Media Id="2" Cabinet="Disk2.cab" EmbedCab="no" CompressionLevel="high" />

		<Directory ...>
		</Directory>

		<DirectoryRef ...>
			<!-- Components/files necessary to run the shell -->
			<!-- Note that all components for the shell are stored in CAB file 1 -->
			<Component ...>
				<File ... DiskId="1" />
			</Component>
			<Component ...>
				<File ... DiskId="1" />
			</Component>
		</DirectoryRef>

		<DirectoryRef ...>
			<!-- Note that all components for the extension are stored in CAB file 2 -->
			<Component ...>
				<File ... DiskId="2" />
			</Component>
		</DirectoryRef>

		<DirectoryRef ...>
			<!-- Note that all components for the SDK are stored in CAB file 2 -->
			<!-- SDK components/files -->
			<Component ...>
				<File ... DiskId="2" />
			</Component>
			<Component ...
				<File ... DiskId="2" />
			</Component>
		</DirectoryRef>

		...
	</Product>
</Wix>
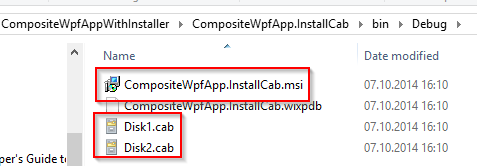
If you build this WiX file you will get three result files:

Publishing MSI Installer on the Web with Azure Blob Storage
Why Blob Storage?
Now that we have the installer, we want to offer it to our customers. Azure Blob Storage is a great way to do that. Here are some reasons why:
- You don't have to run and scale web servers.
- Microsoft manages SSL certificates.
- Blob storage is very cost efficient.
- You can turn on Azure's CDN to offer you customers even greater download experience.
- There are easy-to-use tools to manage your files and folders in Azure Blob Storage (e.g. from redgate, Visual Studio Server Explorer).
- You can offer your installer to everyone (public read) or distribute time-limited download URLs only to your customers (Shared Access Signatures).
Setting up Blob Storage
Follow these steps to configure Azure Blob Storage for public read access:
- Log in at https://manage.windowsazure.com (or use the new Azure portal at https://portal.azure.com)
- Create a storage account.
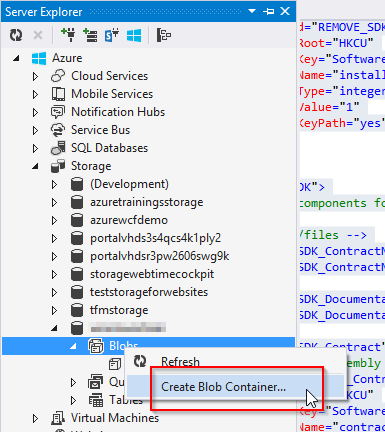
- Use a blob storage client of your choice. I will use Visual Studio Server Explorer here. Connect Visual Studio with your Azure account and create a new container in your storage account:

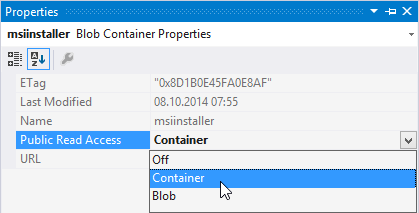
- Enable public read access for your blob container:

- Upload your installer files to the container (click on image to enlarge):

Running the MSI Installer
Now that we have the MSI installer in Azure Blob Storage we can install our software from there. To make sure that Windows only downloads what it really needs, you should use a web debugger like Fiddler to check what's going on.
Note that you must not click on a link to the MSI installer in a browser. In that case, the browser would download the MSI and run it from a local location. Instead, we start the install directly from the URI:
msiexec /i https://yourserver.blob.core.windows.net/msiinstaller/CompositeWpfApp.Install.msi ADDLOCAL=Shell REMOVE=SDK,Extension
Note that the command line does only install the Shell feature, i.e. only files referencing disk 1. If you run it, fiddler will show that Windows only downloads disk 1:

If we add features from disk 2, the installer recognizes that it does not have to read disk 1 again. So the following command line leads to a download of only disk 2 if Shell has been installed before.
msiexec /i https://yourserver.blob.core.windows.net/msiinstaller/CompositeWpfApp.Install.msi ADDLOCAL=Shell,SDK,Extension

As you can see, MSI is clever in determining what to download and Azure Blob Storage is a nice way for you to supply your installers to your customers.
comments powered by