If you want to play with a web APIs like the one from time cockpit, you need a tool for building and running web requests. You could use rather low-level tools like curl or Fiddler. Postman is an alternative with a much nicer UI and the possibility to store requests for later use. In this blog article I introduce Postman and show how you can use it to test-drive time cockpit's OData web api (including OAuth2 authentication).
Get Postman
Postman is a HTTP and REST client that makes it very easy to interactively build requests. If you are looking for general information about Postman (e.g. feater list), you should look at their website. If you want to start using it, you can grab it from Google's Chrome Web Store.
Getting Data Using OData
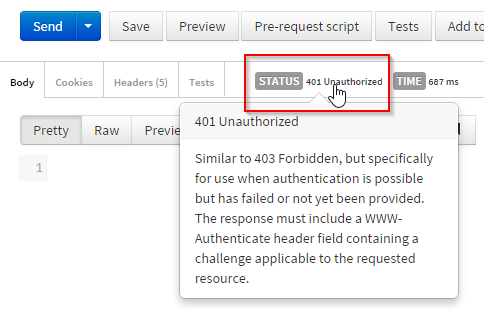
As you might know, time cockpit provides an OData endpoint for reading and manipulating data in your time cockpit database. Let's start with reading. OData has a URL-based query language. The following image (click to enlarge) shows how to build a simple query using Postman:

If you try to run this query, you will not succeed. The result will be an Unauthorized error.
Getting the Token Using OAuth2
Note that time cockpit's OpenID Connect / OAuth2 implementation is based on Thinktecture Identity Server v3. Therefore, this description can be equally applied to all services procted by this open source OAuth2 implementation.
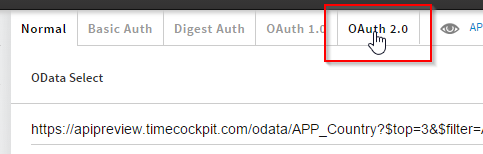
Postman has a nice OAuth2 integration. As time cockpit speaks OAuth2, you can use Postman's UI to retrieve the token.
You need to enter some configuration data in Postman so that it can acquire a token for you. You can use OpenID Connect's Discovery feature to retrieve the OAuth2 URIs. For time cockpit you can get the OpenID Provider Configuration at https://auth.timecockpit.com/core/.well-known/openid-configuration.
- The authorization URL is https://auth.timecockpit.com/core/connect/authorize
- The Access Token URL is https://auth.timecockpit.com/core/connect/token
In addition to OAuth2 URLs you also need a client ID + secret. For time cockpit we have set up a client that you can use for Postman. The client ID is B8990A5C-980F-49F9-B657-E1E0E3DFD230 and the client secret is yHuQwSykMLE8ZukJClNw.
Note that this URLs are subject to change when time cockpit's web API reaches general availability (currently in preview). Also note that the client ID + secret can only be used in conjunction with Postman.
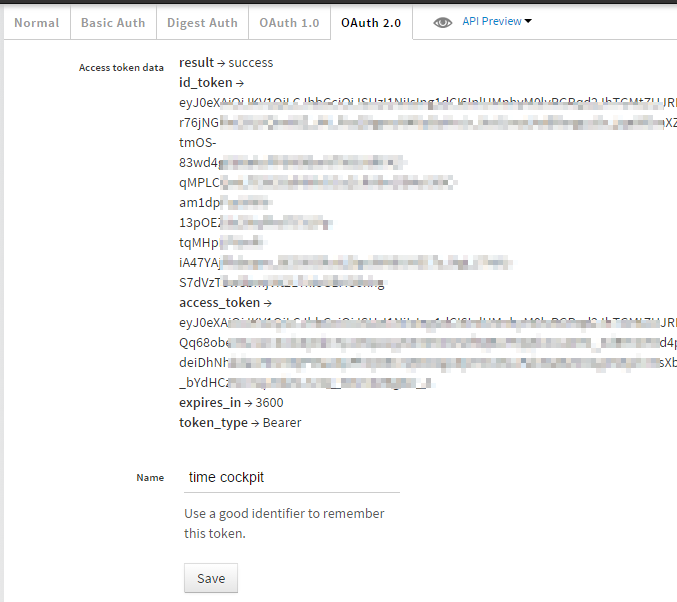
Once you entered this configuration information you can click Get access Token. Postman will use OAuth2 Authorization Code Grant flow to get the access token. One step in this processes is that you enter your time cockpit credentials. Once you provided your user and password, Postman gets the tokens (ID token and access token) and shows them to you. You can provide a name and save them.
You can add the token to your REST requests with a single click:
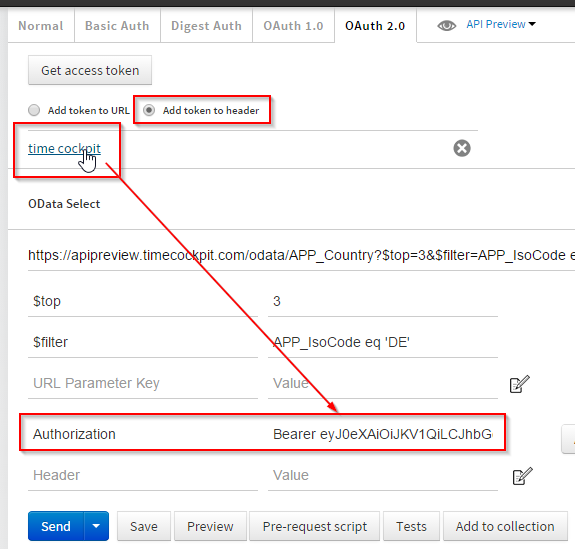
Now you can retry the REST request. It will successfully return the result.
Other REST Operations
Similar to the query shown above you can play with all other operations that time cockpit's OData web API supports. This includes:
- Creating data with POST
- Updating data with PATCH, PUT, and POST
- Deleting data with DELETE
- Running TCQL queries
To make your start with Postman and time cockpit easier, we have created a set of sample requests and published it in Postman's API directory. You can download it here: https://www.getpostman.com/collections/ae594dd2266beff34018
 comments powered by